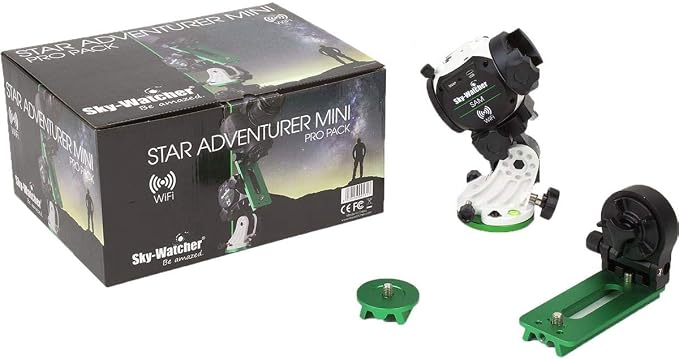
Sky-Watcher Star Adventurer Pro Pack | Camera Warehouse
Second (2ND) / Ex-Demo Product - This product may show signs of carton damage, been repackaged, have been previously opened or used for demonstration or have a mark or imperfection. But otherwise, these items are like NEW. It fits on most astronomical, photo, or video tripods via its 1/4' and 3/8' adaptor. The mount satisfies all the needs of the astrophotographer; with a simple turn of the dial select lunar, solar, or star tracking modes, or four speeds from 0.5x to 12x to create interesting time-lapse videos with your DSLR. Moreover, it contains pre-programmed parameters to assist your DSLR via the optional shutter release cable. The Star Adventurer mount features a V-style dovetail saddle for compatible accessories and optical tube assemblies. The mount can be supplied with 4 AA batteries or via mini USB port. Note on Polar Scope Illuminator From 22nd June 2022, the ACCC has introduced strict new guidelines for products which include button/coin batteries. Unfortunately due to the requirements, the Star Adventurer Polar Scope Illuminator is unable to be included with kits sold in Australia. To fit a camera to the Star Adventurer, either a tripod Ball Head is required (not supplied) or the Dovetail L-Bracket. The Dovetail L-Bracket, used in conjunction with the optional counterweight shaft/counterweight also allows small telescopes (e.g. Maksutov 90mm), with a 1/4'-20 tripod fitting, to be used with the Star Adventurer. A small telescope and camera (using a ball head, not supplied) can be mounted simultaneously on the Dovetail L-bracket. Using just the dovetail bar from the Dovetail L-Bracket, two cameras can be mounted at the same time using two tripod ball heads (not supplied).
Second (2ND) / Ex-Demo Product - This product may show signs of carton damage, been repackaged, have been previously opened or used for demonstration or have a mark or imperfection. But otherwise, these items are like NEW. It fits on most astronomical, photo, or video tripods via its 1/4' and 3/8' adaptor. The mount satisfies all the needs of the astrophotographer; with a simple turn of the dial select lunar, solar, or star tracking modes, or four speeds from 0.5x to 12x to create interesting time-lapse videos with your DSLR. Moreover, it contains pre-programmed parameters to assist your DSLR via the optional shutter release cable. The Star Adventurer mount features a V-style dovetail saddle for compatible accessories and optical tube assemblies. The mount can be supplied with 4 AA batteries or via mini USB port. Note on Polar Scope Illuminator From 22nd June 2022, the ACCC has introduced strict new guidelines for products which include button/coin batteries. Unfortunately due to the requirements, the Star Adventurer Polar Scope Illuminator is unable to be included with kits sold in Australia. To fit a camera to the Star Adventurer, either a tripod Ball Head is required (not supplied) or the Dovetail L-Bracket. The Dovetail L-Bracket, used in conjunction with the optional counterweight shaft/counterweight also allows small telescopes (e.g. Maksutov 90mm), with a 1/4'-20 tripod fitting, to be used with the Star Adventurer. A small telescope and camera (using a ball head, not supplied) can be mounted simultaneously on the Dovetail L-bracket. Using just the dovetail bar from the Dovetail L-Bracket, two cameras can be mounted at the same time using two tripod ball heads (not supplied).
Second (2ND) / Ex-Demo Product - This product may show signs of carton damage, been repackaged, have been previously opened or used for demonstration or have a mark or imperfection. But otherwise, these items are like NEW. It fits on most astronomical, photo, or video tripods via its 1/4' and 3/8' adaptor. The mount satisfies all the needs of the astrophotographer; with a simple turn of the dial select lunar, solar, or star tracking modes, or four speeds from 0.5x to 12x to create interesting time-lapse videos with your DSLR. Moreover, it contains pre-programmed parameters to assist your DSLR via the optional shutter release cable. The Star Adventurer mount features a V-style dovetail saddle for compatible accessories and optical tube assemblies. The mount can be supplied with 4 AA batteries or via mini USB port. Note on Polar Scope Illuminator From 22nd June 2022, the ACCC has introduced strict new guidelines for products which include button/coin batteries. Unfortunately due to the requirements, the Star Adventurer Polar Scope Illuminator is unable to be included with kits sold in Australia. To fit a camera to the Star Adventurer, either a tripod Ball Head is required (not supplied) or the Dovetail L-Bracket. The Dovetail L-Bracket, used in conjunction with the optional counterweight shaft/counterweight also allows small telescopes (e.g. Maksutov 90mm), with a 1/4'-20 tripod fitting, to be used with the Star Adventurer. A small telescope and camera (using a ball head, not supplied) can be mounted simultaneously on the Dovetail L-bracket. Using just the dovetail bar from the Dovetail L-Bracket, two cameras can be mounted at the same time using two tripod ball heads (not supplied).
Second (2ND) / Ex-Demo Product - This product may show signs of carton damage, been repackaged, have been previously opened or used for demonstration or have a mark or imperfection. But otherwise, these items are like NEW. It fits on most astronomical, photo, or video tripods via its 1/4' and 3/8' adaptor. The mount satisfies all the needs of the astrophotographer; with a simple turn of the dial select lunar, solar, or star tracking modes, or four speeds from 0.5x to 12x to create interesting time-lapse videos with your DSLR. Moreover, it contains pre-programmed parameters to assist your DSLR via the optional shutter release cable. The Star Adventurer mount features a V-style dovetail saddle for compatible accessories and optical tube assemblies. The mount can be supplied with 4 AA batteries or via mini USB port. Note on Polar Scope Illuminator From 22nd June 2022, the ACCC has introduced strict new guidelines for products which include button/coin batteries. Unfortunately due to the requirements, the Star Adventurer Polar Scope Illuminator is unable to be included with kits sold in Australia. To fit a camera to the Star Adventurer, either a tripod Ball Head is required (not supplied) or the Dovetail L-Bracket. The Dovetail L-Bracket, used in conjunction with the optional counterweight shaft/counterweight also allows small telescopes (e.g. Maksutov 90mm), with a 1/4'-20 tripod fitting, to be used with the Star Adventurer. A small telescope and camera (using a ball head, not supplied) can be mounted simultaneously on the Dovetail L-bracket. Using just the dovetail bar from the Dovetail L-Bracket, two cameras can be mounted at the same time using two tripod ball heads (not supplied).
in 7 offers
The lowest price for Sky-Watcher Star Adventurer Pro Pack | Camera Warehouse right now is $664.70 at TS2 Space, compared across 6 retailers.
The all-time low was $382.99 on 1 Aug 2026 — today's price is 74% above the lowest ever. It has been notably cheaper before — worth setting a price alert.
Prices last updated 25 Oct 2026.
Last updated at 25/10/2026 11:35:29
Skywatcher Star Adventurer 2i Wi-Fi Photo Set - Cameras
Delivery $2.85
Sky-Watcher Sky-Watcher Star Adventurer 2i Pro Pack WIFI Version
Sky-Watcher Star Adventurer 2i Pro Pack
Skywatcher Star Adventure 2i Pro Pack Equatorial Mount Wifi With Guide
Delivery $26.60
Affiliate Disclosure: We may receive a small commission for purchases made through this link at no extra cost to you. This helps support our site. Thank you!
Sky-Watcher Star Adventurer 2i Pro Pack Motorized DSLR Night Sky Tracker Equatorial Mount for Portable Nightscapes, Time-Lapse and Panoramas Wi-Fi App
Delivery between 27 Oct – 7 Nov $28.44
Sky-Watcher Star Adventurer 2i Pro Pack Motorized DSLR Night Sky Tracker Equatorial Mount for Portable Nightscapes, Time-Lapse and Panoramas Wi-Fi A
Free delivery between 3–6 Nov
originally posted on adorama.com
In general, everything was good. My only issue was the quality of the illuminator for polar alignment. The light level was very low and not even across the field of view. I did some work on the light pipe since there was excessive glue on the internal side, and changed the LED to one with higher efficiency. It works well now. Since I'm older, bending down to look through the polar scope is difficult. I have ordered a used Nikon DR-3 right-angle viewer which I will adapt to the polar scope and it should be good. There are multiple choices for a right-angle viewer but this was the least expensive option.
originally posted on bhphotovideo.com
Before I bought one, I asked the B&H customer rep which of the two different makes I was considering is the better one. The reply was that there was more demand and purchases for this particular make and model so I bought it.Right off the bat, my camera (placed on the fine-tuning mounting ssembly) kept “slipping” and “drooping” when on the sideways position even though the clutch was very tight. I wrote the manufacturer, sending proof of purchase and several photos of my issue/problem. After several more email exchanges, they agreed to send me a replacement mounting assembly. When it arrived, I tried my camera with it and there was no more “drooping” nor “slipping.” Well and good. Just that I wish I didn’t have the problem the first time I got the unit.Second ... MoreBefore I bought one, I asked the B&H customer rep which of the two different makes I was considering is the better one. The reply was that there was more demand and purchases for this particular make and model so I bought it.Right off the bat, my camera (placed on the fine-tuning mounting ssembly) kept “slipping” and “drooping” when on the sideways position even though the clutch was very tight. I wrote the manufacturer, sending proof of purchase and several photos of my issue/problem. After several more email exchanges, they agreed to send me a replacement mounting assembly. When it arrived, I tried my camera with it and there was no more “drooping” nor “slipping.” Well and good. Just that I wish I didn’t have the problem the first time I got the unit.Second gripe: the polar scope illumination is a JOKE. The “Off” and “On” rotational switch is actually just to tighten the darned cap. Untightened, the red light is off, tightened, the red light is on, continuously. If you want to “turn the light off” you have to use the dimmer switch on the other side. D’uh!Third gripe: the latitude adjustment gear is plastic. I wonder how long before one tooth (or several) breaksoff due to the stress of tracker’s body weight and/or the strain of rotating the gear.The main battery cover could use a better locking device. In the dark while night shooting, you could easily knock the cover off and it’s gonna be a difficult task looking for it on the ground.In the final analysis, I might have been better off with another make/model, especially considering that $419 isn’t really peanuts these days and I think I should have gotten a better value for my bucks (though I was lucky enough to get the last unit at that price because next time I looked, the price tag has gone up to $439!).Would I recommend it to a friend? Maybe, but with all the caveats I mentioned above.
originally posted on bhphotovideo.com
This is a well designed, compact system for astrophotographywith telephoto lenses.I used to own a first-generation Kenko Skymemo which was good. The Sky-Watcher is an improvement (lighter, more compact and easier to balance with a camera/lens/ball head.) It is easy to mount on a heavy photo tripod, balance the camera and lens with the counterweight and trek down a trail with your camera/lens and powerpack to shoot Milky Way starscapes and other astrophotos in your location of choice.It is easy to polar align. Just preset your equatorial wedge to your latitude, set up your tripod so it is level and have the polar scope roughly pointed towards Polaris (Northern hemisphere). Use the Polar Clock Utility in the software and line up the polar scope reticle as ... MoreThis is a well designed, compact system for astrophotographywith telephoto lenses.I used to own a first-generation Kenko Skymemo which was good. The Sky-Watcher is an improvement (lighter, more compact and easier to balance with a camera/lens/ball head.) It is easy to mount on a heavy photo tripod, balance the camera and lens with the counterweight and trek down a trail with your camera/lens and powerpack to shoot Milky Way starscapes and other astrophotos in your location of choice.It is easy to polar align. Just preset your equatorial wedge to your latitude, set up your tripod so it is level and have the polar scope roughly pointed towards Polaris (Northern hemisphere). Use the Polar Clock Utility in the software and line up the polar scope reticle as indicated in the clock utility.There is really no need to mount the polar scope illuminator. Just occasionally shine your flashlight on the front of the polar scope, and the reticle will be visible enough for alignment. The three cameras I have also have cabled intervalometers, so I have had no need to buy another shutter cable and use the WiFi system.
| Durability | Not Water Resistant |
| Camera Included | No |
| Camera Mount Type | Vixen-style saddle plate, 3/8-inch thread socket, Dual 3/8-inch thread panoramic plate |
| Camera Type | DSLR |
| Dimensions | 35.31 x 24.38 x 16 cm |
Skywatcher Star Adventurer 2i Wi-Fi Photo Set - Cameras
Delivery $2.85
Sky-Watcher Sky-Watcher Star Adventurer 2i Pro Pack WIFI Version
Sky-Watcher Star Adventurer 2i Pro Pack
Skywatcher Star Adventure 2i Pro Pack Equatorial Mount Wifi With Guide
Delivery $26.60
Affiliate Disclosure: We may receive a small commission for purchases made through this link at no extra cost to you. This helps support our site. Thank you!
Sky-Watcher Star Adventurer 2i Pro Pack Motorized DSLR Night Sky Tracker Equatorial Mount for Portable Nightscapes, Time-Lapse and Panoramas Wi-Fi App
Delivery between 27 Oct – 7 Nov $28.44
In general, everything was good. My only issue was the quality of the illuminator for polar alignment. The light level was very low and not even across the field of view. I did some work on the light pipe since there was excessive glue on the internal side, and changed the LED to one with higher efficiency. It works well now. Since I'm older, bending down to look through the polar scope is difficult. I have ordered a used Nikon DR-3 right-angle viewer which I will adapt to the polar scope and it should be good. There are multiple choices for a right-angle viewer but this was the least expensive option.
Before I bought one, I asked the B&H customer rep which of the two different makes I was considering is the better one. The reply was that there was more demand and purchases for this particular make and model so I bought it.Right off the bat, my camera (placed on the fine-tuning mounting ssembly) kept “slipping” and “drooping” when on the sideways position even though the clutch was very tight. I wrote the manufacturer, sending proof of purchase and several photos of my issue/problem. After several more email exchanges, they agreed to send me a replacement mounting assembly. When it arrived, I tried my camera with it and there was no more “drooping” nor “slipping.” Well and good. Just that I wish I didn’t have the problem the first time I got the unit.Second ... MoreBefore I bought one, I asked the B&H customer rep which of the two different makes I was considering is the better one. The reply was that there was more demand and purchases for this particular make and model so I bought it.Right off the bat, my camera (placed on the fine-tuning mounting ssembly) kept “slipping” and “drooping” when on the sideways position even though the clutch was very tight. I wrote the manufacturer, sending proof of purchase and several photos of my issue/problem. After several more email exchanges, they agreed to send me a replacement mounting assembly. When it arrived, I tried my camera with it and there was no more “drooping” nor “slipping.” Well and good. Just that I wish I didn’t have the problem the first time I got the unit.Second gripe: the polar scope illumination is a JOKE. The “Off” and “On” rotational switch is actually just to tighten the darned cap. Untightened, the red light is off, tightened, the red light is on, continuously. If you want to “turn the light off” you have to use the dimmer switch on the other side. D’uh!Third gripe: the latitude adjustment gear is plastic. I wonder how long before one tooth (or several) breaksoff due to the stress of tracker’s body weight and/or the strain of rotating the gear.The main battery cover could use a better locking device. In the dark while night shooting, you could easily knock the cover off and it’s gonna be a difficult task looking for it on the ground.In the final analysis, I might have been better off with another make/model, especially considering that $419 isn’t really peanuts these days and I think I should have gotten a better value for my bucks (though I was lucky enough to get the last unit at that price because next time I looked, the price tag has gone up to $439!).Would I recommend it to a friend? Maybe, but with all the caveats I mentioned above.
This is a well designed, compact system for astrophotographywith telephoto lenses.I used to own a first-generation Kenko Skymemo which was good. The Sky-Watcher is an improvement (lighter, more compact and easier to balance with a camera/lens/ball head.) It is easy to mount on a heavy photo tripod, balance the camera and lens with the counterweight and trek down a trail with your camera/lens and powerpack to shoot Milky Way starscapes and other astrophotos in your location of choice.It is easy to polar align. Just preset your equatorial wedge to your latitude, set up your tripod so it is level and have the polar scope roughly pointed towards Polaris (Northern hemisphere). Use the Polar Clock Utility in the software and line up the polar scope reticle as ... MoreThis is a well designed, compact system for astrophotographywith telephoto lenses.I used to own a first-generation Kenko Skymemo which was good. The Sky-Watcher is an improvement (lighter, more compact and easier to balance with a camera/lens/ball head.) It is easy to mount on a heavy photo tripod, balance the camera and lens with the counterweight and trek down a trail with your camera/lens and powerpack to shoot Milky Way starscapes and other astrophotos in your location of choice.It is easy to polar align. Just preset your equatorial wedge to your latitude, set up your tripod so it is level and have the polar scope roughly pointed towards Polaris (Northern hemisphere). Use the Polar Clock Utility in the software and line up the polar scope reticle as indicated in the clock utility.There is really no need to mount the polar scope illuminator. Just occasionally shine your flashlight on the front of the polar scope, and the reticle will be visible enough for alignment. The three cameras I have also have cabled intervalometers, so I have had no need to buy another shutter cable and use the WiFi system.
If you are looking for a well made protable star tracker for your camera this could well be for you. Nicely engineered from alloy it has the feel of quality, and fits together well. The instruction manual can be a little confusing and therefore itis probably better to consult Youtube for information on how to set things like Polar alignment, which I found to be really easy. There are a few small niggles... the illuminator unit for the polar alignment scope, though functions well is a small plastic accessory that is a push fit into the end of the polar alignment scope, which will be easily lost on a dark night in the middle of a field. Also as is highlighted on the you tube reviews the main "on /off" dial is a little too easy to move so it can be inadvertantly ... MoreIf you are looking for a well made protable star tracker for your camera this could well be for you. Nicely engineered from alloy it has the feel of quality, and fits together well. The instruction manual can be a little confusing and therefore itis probably better to consult Youtube for information on how to set things like Polar alignment, which I found to be really easy. There are a few small niggles... the illuminator unit for the polar alignment scope, though functions well is a small plastic accessory that is a push fit into the end of the polar alignment scope, which will be easily lost on a dark night in the middle of a field. Also as is highlighted on the you tube reviews the main "on /off" dial is a little too easy to move so it can be inadvertantly switched on, and thus drain the batteries. A big selling point for me was that theunit is powered by easy to obtain "AA" batteries, so, providing spares are carried the will be no issues with lack of power. The Star Adventurer carries a wacking payload of upto 11lbs which for a protable unit is more than enough. It is however unclear as to how this payload is calculated as there is conflicting infromation relating to if the "counter weight" is included in that figure or if it is what can be mounted on the unit as wel as the counter weight. Either way this is still a pretty acceptable figure. People have reported issues with "play" in the mounting screws, however I have not found this to be the case and wonder if, after having seen the amount of equipment that they have loaded onto the tracker, they have exceeded the weight limit and put an unacceptable strain on everything. I have used this unit to track Orion's nebulae over a period of an hour or so and the images that it has produced have been very clear with no evidence of any star distortion during the collection of one minute exposures throughout that time.
I guess if you are reading this review you will already have some idea what the Star Adventurer is designed to do. Primarily its a star tracker, but it will also track both the sun & moon, and it can be used for time-lapse photography. I have already done a limited amount of astrophotography, but until now only using a DSLR camera in a fixed position on a tripod. The addition of the Star Adventurer will allow the camera to move with the stars, (or more correctly it will counteract the movement of the Earth) thus allowing for much longer exposures, whilst avoiding star trails. Multiple images can then be stacked to produce much more detailed photographs of the night sky. Whilst I have yet to use the Star Adventurer in anger, it does appear to be a solidly constructed ... MoreI guess if you are reading this review you will already have some idea what the Star Adventurer is designed to do. Primarily its a star tracker, but it will also track both the sun & moon, and it can be used for time-lapse photography. I have already done a limited amount of astrophotography, but until now only using a DSLR camera in a fixed position on a tripod. The addition of the Star Adventurer will allow the camera to move with the stars, (or more correctly it will counteract the movement of the Earth) thus allowing for much longer exposures, whilst avoiding star trails. Multiple images can then be stacked to produce much more detailed photographs of the night sky. Whilst I have yet to use the Star Adventurer in anger, it does appear to be a solidly constructed piece of kit, mainly from cast metal with some plastic parts, (more of which later). Its fairly easy to set up, although I suspect accurately lining it up with the celestial North Pole may prove not the easiest of tasks at night, even with the use of a torch. I would strongly suggest users try to become conversant with the set-up and adjustment of this device before its first use out in the field. Setting the equatorial wedge to the correct latitude and attaching it to your tripod are things best done in daylight rather than at your chosen dark sky location. The removeable plastic parts, (the battery cover, front & rear polar scope covers and the polar scope illuminator - all made of black plastic) are all fairly small and not the best/tightest of fits, so care will need to be taken at night to avoid their loss, or even treading on them in the darkness if dropped. Quite why the polar illuminator wasnt incorporated into the body of the tracker I dont know, perhaps the manufactures will address this in a future re-design? Also included with the Star Adventurer Pro Pack are a quick release plate, which affixes to the base of the tracking unit, and a ball head adaptor plate, which will need to be attached to the base of your own ball head. Once again, these two items are best pre-assembled in daylight rather than darkness. Ive yet to assemble the other parts of the Star Adventurer, (the fine-tuning mounting assembly & counterweight), which are designed to carry a telescope and/or a DSLR with a telephoto/zoom lens, so Im not in a position to comment on their operation, but again they appear solid and well made. Astrophotography at rural dark sky locations on moonless nights is never the easiest of pastimes, and Ive no doubt the addition of the Star Adventurer to the equation is only likely to add to the complexity, but if the reviews Ive read by others are correct it will be worth the effort and investment. I was fortunate enough to find my particular purchase on eBay as a pre-owned, but never used example, which saved me a few s on the cost of a brand new one. If you are prepared to settle for a pre-loved Star Adventurer then be quick as they dont hang around for long. If only new will do, a little bit of internet research should reveal where to find the most competitively priced options. In summary, its all looking good at the moment, but so far, its only been test driven in daylight. If it fails to live up to expectations Ill update this review in due course. As things stand at the moment I would be happy to recommend this product, just be careful with those small black plastic parts, so only four stars Im afraid
This thing is great, made a massive difference in my pics on the first night of using it. Super easy to align with Polaris, and pretty flexible. Getting used to all the tightening rings takes some time. I bought a Z mount to give myself even more flexibility when it comes to orienting the camera on the rotating section. Balancing can get ... creative if you stick something heavy on it like the 600mm Sigma I was playing with.One issue is using an USB battery pack to power it - a newer higher capacity pack I have won't work, but an older crappy one tucked in a flashlight does. I've since read that this unit pulls so few Amps the newer banks shut themselves off because they think they are not in use.And as an extra bonus there is extra room in the solid foam in the ... MoreThis thing is great, made a massive difference in my pics on the first night of using it. Super easy to align with Polaris, and pretty flexible. Getting used to all the tightening rings takes some time. I bought a Z mount to give myself even more flexibility when it comes to orienting the camera on the rotating section. Balancing can get ... creative if you stick something heavy on it like the 600mm Sigma I was playing with.One issue is using an USB battery pack to power it - a newer higher capacity pack I have won't work, but an older crappy one tucked in a flashlight does. I've since read that this unit pulls so few Amps the newer banks shut themselves off because they think they are not in use.And as an extra bonus there is extra room in the solid foam in the box so you can cut chunks out and add more stuff!
I had the older version of the Star Adventurer and had been quite happy with it. So when this new, WiFi enable version came out, I wasn't quite sure if I wanted to upgrade, just for the WiFi. I initially thought that the WiFi would be a gimmick, but it is actually very useful. You can control all the settings (i.e. modes) from your phone or iPad. Moreover, if you get the SNAP cable and connect it to your DSLR, you can use your phone as an intervalometer - you don't need an external intervalometer. However, if you like to control your camera via your external intervalometer or don't think that you will use the WiFi feature, then save yourself some money and get the older version (if you can find it).FYI, Kenko has the exact same mount under their brand and it is ... MoreI had the older version of the Star Adventurer and had been quite happy with it. So when this new, WiFi enable version came out, I wasn't quite sure if I wanted to upgrade, just for the WiFi. I initially thought that the WiFi would be a gimmick, but it is actually very useful. You can control all the settings (i.e. modes) from your phone or iPad. Moreover, if you get the SNAP cable and connect it to your DSLR, you can use your phone as an intervalometer - you don't need an external intervalometer. However, if you like to control your camera via your external intervalometer or don't think that you will use the WiFi feature, then save yourself some money and get the older version (if you can find it).FYI, Kenko has the exact same mount under their brand and it is cheaper (mount vs. mount) than the older version of the Star Adventurer - you can find it at retailers under the 'Kenko Astro Tracker SKYMEMO S' model name. It seems Skywatcher and Kenko have the same supplier for this mount. If you get that, you can buy the declination bracket/ counterweight kit and the wedge from SkyWatcher and the entire cost will still work out cheaper than buying the Star Adventurer Pro Pack.As compared with the iOptron Skyguider Pro - that was a decent option earlier, but I would get this 2i version of the Star Adventurer over the iOptron Skyguider Pro. Apart from the WiFi, the Star Adventurer has a few positives:1) The declination bracket has a fine adjustment knob and it is really nice to be able to turn on that axis in small increments to position.2) This tracker has graduated markings near the eyepiece. This is super useful as if you buy the Polar Scope Align Pro app, you can actually Polar Align when the polar clock in the reticle is at any position (i.e. you don't need to have the 0 and 6 vertical). This is very useful because you normally Polar Align at the 0 and 6 position and then rotate your gear to point to the DSO. In that process, the Polar alignment might change. But to check that, you have to swing it back to the 0 and 6 position. But with these markings and this app, you can correct the PA when the polar clock is in any position.3) Finally, you can actually pan while doing time-lapses, which is very cool.The one caveat is that the polar illuminator is not built in and you have to attach it. It is a minor nit as the advantages supersede the issues.All in all, very happy with this new version and I consider the WiFi a worthy upgrade. Highly recommended!
I had really high hopes about the product after reading all the reviews. After 3 weeks there were multiple disappointments which led my decision to return it.1) the app didn't work. Worse than that, the astrophotography mode on the tracker was giving me an issue in that the motor would stop working. After spending hours on the web researching and sending an email to the help desk, I nearly gave up. I finally figured it out. The app setting was controlling the star tracker even though the app was closed. Only after I timed how long the motor stayed on did I figure it out.2) when I tried to use the app to control the camera with the tether it did not trigger the shutter. Never figured out why that wouldn't work.3) I could not balance the star tracker. I was ... MoreI had really high hopes about the product after reading all the reviews. After 3 weeks there were multiple disappointments which led my decision to return it.1) the app didn't work. Worse than that, the astrophotography mode on the tracker was giving me an issue in that the motor would stop working. After spending hours on the web researching and sending an email to the help desk, I nearly gave up. I finally figured it out. The app setting was controlling the star tracker even though the app was closed. Only after I timed how long the motor stayed on did I figure it out.2) when I tried to use the app to control the camera with the tether it did not trigger the shutter. Never figured out why that wouldn't work.3) I could not balance the star tracker. I was using a d4, a really right stuff ball head and a 70-200. The weight provided was not big enough to balance it. Even adjusting it it. So I bought an added weight. I got it to balance but my Payload was 14lbs. 3 lbs to heavy.4) the wedge was ok but when you tighten it up, it would screw up the alignment.Not being able to do deep space objects with my camera gear (I didn't even try the 150-600) I gave up.I did manage to get a great 2 minute exposure with zero star trails. I did manage to figure out how to align.However with the app being a failure, the payload being too much, and the trigger not working I decided that it was not worth it.If you have a simple setup and lighter gear it would work.
This is a phenomenal tracker, and it's almost exactly what I expected. I have taken great photos with it and find it generally far superior to the iOptron in accuracy, ease of alignment, and construction. I've used it for small lenses like my 20mm Nikkor, and big ones like my 150-600mm Sigma. Works great across the board.I really only have a few complaints/comments: 1. the abnormal shape and high weight of the tracker makes it really tough to travel with, and it does not come with a travel case beyond the box (which is huge). Granted, if your rig is heavy enough to need the counter-weight, I doubt you expect to easily travel with it anyway, but it's worth noting. 2. It runs on AA batteries, which is frustrating. Recommend re-chargables. 3. While the alignment ... MoreThis is a phenomenal tracker, and it's almost exactly what I expected. I have taken great photos with it and find it generally far superior to the iOptron in accuracy, ease of alignment, and construction. I've used it for small lenses like my 20mm Nikkor, and big ones like my 150-600mm Sigma. Works great across the board.I really only have a few complaints/comments: 1. the abnormal shape and high weight of the tracker makes it really tough to travel with, and it does not come with a travel case beyond the box (which is huge). Granted, if your rig is heavy enough to need the counter-weight, I doubt you expect to easily travel with it anyway, but it's worth noting. 2. It runs on AA batteries, which is frustrating. Recommend re-chargables. 3. While the alignment mechanism is much superior to the iOptron, the lack of built-in lighting for the alignment viewport (which the iOptron does have) makes it take WAY longer to align the thing. The little light they include is really insufficient. I haven't yet found a good work around, but I also haven't really tried too hard.Overall, none of the above is a deal breaker, and I would still absolutely and strongly recommend this tracker. It's a phenomenal piece of gear and will help you to get the shots you want.
After a 25+ year hiatus from doing some film-based, prime focus and piggyback astrophotography with a vintage C-8 telescope, I wanted to try again using digital cameras andpost-processing some of the new software designed for digital astrophotography.With the C-8, I didn’t need to do a very precise polar alignment, as I had a guide scope with slow motion RA and DEC controls. Even with a 15 minute exposure, field rotation near the center of the photos was okay. Also, finding a dim target was easy after adjusting the RA and DEC setting circles on any planet or bright star, and then turning the scope to the dim object’s coordinates.My new objectives are to get better photos of deep sky objects than I did years ago with film,and photos of deep sky objects that ... MoreAfter a 25+ year hiatus from doing some film-based, prime focus and piggyback astrophotography with a vintage C-8 telescope, I wanted to try again using digital cameras andpost-processing some of the new software designed for digital astrophotography.With the C-8, I didn’t need to do a very precise polar alignment, as I had a guide scope with slow motion RA and DEC controls. Even with a 15 minute exposure, field rotation near the center of the photos was okay. Also, finding a dim target was easy after adjusting the RA and DEC setting circles on any planet or bright star, and then turning the scope to the dim object’s coordinates.My new objectives are to get better photos of deep sky objects than I did years ago with film,and photos of deep sky objects that eluded my film days. I started off using my current camera equipment on a fixed tripod, but was limited to taking short exposures so that there wouldn’t be significant star trailing. A star tracker was needed to take longer exposures to photograph dimmer objects such as nebulae. After reading reviews and watching Internet videos, I bought a Star Adventurer.Eager to try it out, I did what I thought was an okay polar alignment using an iPhone app, but there was significant star trailing. I didn’t know if the cause was poor polar alignment or if the polar scope needed calibrating. Testing the next dayshowed that a minor polar scope adjustment was needed.The Star Adventurer seems to work okay, but there are a few drawbacks to using it. First, one ofthe online videos stated that the Fine-Tuning Mounting Assembly needed to be off to do polar alignment. This would be a hassle for me, and I would rather attach this assembly and do approximate balancing ahead of time in a well-litarea. There was an additional plastic connector that came with the Polar Scope Illuminator, but I didn’t see what it was for. After contacting themanufacturer, I learned that the extra part was designed to fit into the Fine-Tuning Mounting Assembly, so that polar alignment could be done with the assembly attached.Well, polar alignment wasn’t as easy as I had hoped. The Polar Scope Illuminator was almosttoo bright to see the reticle, or almost too dim to see it at all. Furthermore, there’s a dimmer on the illuminator, but no way to turn it all the way offwithout removing the battery. Also, it would have been good if the design allowed for easy attachment of a right-angle viewer, as I already have two different right-angle viewers, and don’t want to buy a third one with a clamp for polar scopes.Getting decent images with a Canon 7DII and a Canon 200mm L lens worked okay. I took nineexposures of the Flame and Horsehead nebulae at f/2.8, ISO 1600, with exposures ranging from 20 to 120 seconds. There wasn’t much star trailing at 20 seconds, and only a little at 120 seconds. Stacking the photos using the median pixel value seemed to eliminate most of the start trailing in the final result (photo attached). I live in a Bortle 4 area, so 120 seconds was already starting to introduce too much sky glow; thus, 120 second exposures are about the limit without buying a skyglow filter.But my attempt to get photos of the nearby Rosette Nebula was a failure, only becauseI couldn’t get this nebula in the film frame after moving off of Betelguese. I really missed my old setting circles. I now realize that I can use the time and date graduation circles to determine a relative RA delta from a known value, but still needed a way to get to the correct DEC value. I first printed a 360 degree ring with a 2-1/2 inch diameter, sandwiched between to mylar sheets, andattached it to the Fine-Tuning Mounting Assembly as shown in the first attached photo. With the camera in place, it was a bit awkward to use, so I reprinted the 360 degree ring at 3 inches and attached it as shown in the second photo. Ihaven’t had a chance to try these out as relative setting circles, but they should help locating dim objects relative to a nearby bright star.I gave the Star Adventurer only 4 stars, as improvements to the polar alignment illuminator and scope, and adding setting circles would make it even better.
| Durability | Not Water Resistant |
| Camera Included | No |
| Camera Mount Type | Vixen-style saddle plate, 3/8-inch thread socket, Dual 3/8-inch thread panoramic plate |
| Camera Type | DSLR |
| Dimensions | 35.31 x 24.38 x 16 cm |